SpringBoot学习笔记
笔记基于 Springboot 2.4.0 进行记录
第一个Springboot程序
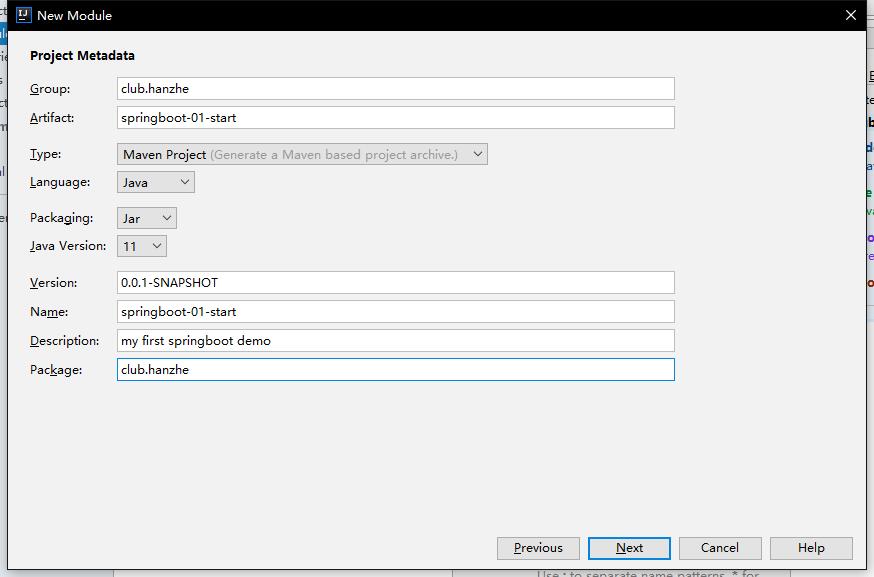
使用 idea 快速创建一个 boot 程序:
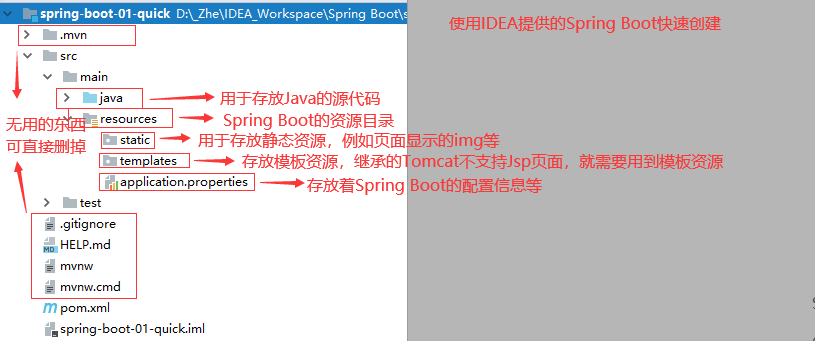
目录结构介绍
pom 文件解析
- 项目元数据:创建时候输入的Project Metadata部分,也就是Maven项目的基本元素,包括:groupId、artifactId、version、name、description等
- parent:继承
spring-boot-starter-parent父工程,主要用于依赖管理、控制版本等内容
- dependencies:项目具体依赖,这里包含了
spring-boot-starter-web用于实现HTTP接口(该依赖中包含了Spring MVC);spring-boot-starter-test用于编写单元测试的依赖包。更多功能模块的使用我们将在后面的教程中逐步展开。
- build:构建配置部分。默认使用了
spring-boot-maven-plugin,配合spring-boot-starter-parent就可以把Spring Boot应用打包成JAR来直接运行。
1
2
3
4
5
6
7
8
9
10
11
12
13
14
15
16
17
18
19
20
21
22
23
24
25
26
27
28
29
30
31
32
33
34
35
36
37
38
39
40
41
42
43
44
45
| <?xml version="1.0" encoding="UTF-8"?>
<project xmlns="http://maven.apache.org/POM/4.0.0" xmlns:xsi="http://www.w3.org/2001/XMLSchema-instance"
xsi:schemaLocation="http://maven.apache.org/POM/4.0.0 https://maven.apache.org/xsd/maven-4.0.0.xsd">
<modelVersion>4.0.0</modelVersion>
<parent>
<groupId>org.springframework.boot</groupId>
<artifactId>spring-boot-starter-parent</artifactId>
<version>2.3.2.RELEASE</version>
<relativePath/>
</parent>
<groupId>site.hanzhe</groupId>
<artifactId>springboot-01-start</artifactId>
<version>0.0.1-SNAPSHOT</version>
<name>springboot-09-mybatis-plus</name>
<description>my frist springboot demo</description>
<dependencies>
<dependency>
<groupId>org.springframework.boot</groupId>
<artifactId>spring-boot-starter</artifactId>
</dependency>
<dependency>
<groupId>org.springframework.boot</groupId>
<artifactId>spring-boot-starter-test</artifactId>
<scope>test</scope>
<exclusions>
<exclusion>
<groupId>org.junit.vintage</groupId>
<artifactId>junit-vintage-engine</artifactId>
</exclusion>
</exclusions>
</dependency>
</dependencies>
<build>
<plugins>
<plugin>
<groupId>org.springframework.boot</groupId>
<artifactId>spring-boot-maven-plugin</artifactId>
</plugin>
</plugins>
</build>
</project>
|
启动类介绍
springboot 的启动类和平时写 Java 时的 main 函数差不太多,需要注意的点有:
- 启动类要加上 @SpringBootApplication 注解,标识这是一个启动类
- 在 main 函数中要调用 SpringApplication 的静态函数 run,并传入启动类的 class 和 args 参数
1
2
3
4
5
6
7
8
| @SpringBootApplication
public class Springboot10SwaggerApplication {
public static void main(String[] args) {
SpringApplication.run(Springboot10SwaggerApplication.class, args);
}
}
|
@SpringBootApplication 注解中包含了自动配置的注解 EnableAutoConfiguration 和自动扫描包的注解 @ComponentScan 等等,为我们提供了全自动的初始化过程。
springboot 启动小彩蛋
在 resources 目录下复制一个 banner.txt 的文件,他会以按照文件内的图案作为启动的 LOGO
1
2
3
4
5
6
7
8
| _________________
< W D N M D >
-----------------
\ ^__^
\ (oo)\_______
(__)\ )\/\
||----w |
|| ||
|
开发注意事项
boot 项目中含有启动类,位于 site.hanzhe.**Application.java,这里需要注意:我们在创建类或者接口以及包的时候要求必须在启动类同级目录以及同级目录的子目录下创建
检测的到: site.hanzhe.dao.Test.java
检测不到: site.example.dao.Test.java
如果我们不得不在其他位置创建类或者接口,如果想要被 Spring 发现的话,可以新建配置类使用以下方法:
- 在配置类中使用
@ComponentScan("指定包的位置")
- 在配置类或启动类下,通过
@Bean() 注解将实例放进 IOC 容器中
配置文件的使用
springboot 中支持两种格式的配置文件,一个是创建项目时携带的 properties 文件,另一种是 yml 文件,配置文件名为 application
properties配置文件
properties 配置文件的书写格式是以 . 分隔符控制层级,而后用 = 进行赋值操作 ,例如:
1
2
3
4
5
6
7
|
server.port=8008
mysql.driver=com.mysql.jdbc.Driver
mysql.url=jdbc:mysql://localhost:3306/database
mysql.username=zhang
mysql.password=hanzhe
|
如果赋值中包含 k-v 的键值对或者数组,集合赋值:
1
2
3
4
5
|
person.map.key1=value1
person.map.key2=value2
person.list=1,2,3,4,5
|
常见的一些配置项
1
2
3
4
5
6
7
8
9
10
11
12
13
14
15
16
17
|
server.port=8000
server.servlet.context-path=/name
spring.mvc.favicon.enabled=true
debug=false
spring.mvc.date-format=yyyy-MM-dd
spring.thymeleaf.cache=true
spring.mvc.static-path-pattern=/resource/**
spring.datasource.type=druid
spring.datasource...=...
|
yml 配置文件
yml 配置的语法是利用 空格 控制缩进的方式编写文件,格式为 key: value 有些类似 JSON,value 前需要留有空格,多层级时用 回车+空格 来控制层级,例如:
1
2
3
4
5
6
7
8
9
|
server:
port: 8008
mysql:
driver: com.mysql.jdbc.Driver
url: jdbc:mysql://localhost:3306/database
username: zhang
password: hanzhe
|
如果赋值中包含 k-v 的键值对或者数组,集合赋值:
1
2
3
4
5
6
7
8
9
10
11
12
13
14
|
person:
key1: value1
key2: value2
person: { key1: value1 , key1: value1 }
person:
- 1
- 2
- 3
person:
list={1,2,3,4,5}
|
关于字符串赋值的细节:
- 无引号:默认赋值字符串可以不适用引号,直接书写 value 即可,
- 单引号:单引号内的字符串支持特殊格式,例如
'哈哈\n哈哈',那么输出到控制台之后可以发现字符串中间会有换行效果,四个哈哈之间有一个换行
- 双引号:双引号内的字符串就是字符串,不会发生任何改变,同样使用
"哈哈\n哈哈",输出到控制台之后可以发现没有任何变化,控制台上原样输出了 \n 这个字符串
类的绑定配置 ( 全局 )
将某些固定的属性值放在配置文件中,然后在通过 bean 关联其中进行使用,配置文件如下所示:
properties配置文件写法:
1
2
3
4
| person.name=张涵哲
person.age=22
person.cat.name=哈哈
person.cat.color=白色
|
yml配置文件写法:
1
2
3
4
5
6
| person:
age: 22
name: 张涵哲
cat:
name: 哈哈
color: 橘色
|
书写与配置文件关联的 bean
1
2
3
4
5
6
7
8
9
10
| @Component
@ConfigurationProperties("person")
public class Person {
private String name;
private int age;
private Cat cat;
}
|
1
2
3
4
5
6
7
8
|
@Component
@ConfigurationProperties("cat")
public class Cat {
private String name;
private String color;
}
|
**测试类代码**,通过测试类可以查看到数据已经被封装上来了
1
2
3
4
5
6
7
8
9
| @SpringBootTest
@RunWith( SpringRunner.class )
class SpringBoot02ConfigApplicationTests {
@Autowired private Person person;
@Test
public void test1() {
System.out.println(person);
}
}
|
注意事项:
- 配置文件关联的 bean 必须添加到 spring 的 ioc 容器中。
- bean 必须提供 get set 方法,关联注入依靠的就是 get set 方法
- 如果两种类型的配置文件并存的情况下,properties 的优先级高于 yml
类绑定配置 ( 指定 )
配置文件可以书写参数和 bean 关联在一起,但是如果把所有参数都放在 application 全局配置文件中,那么配置文件就显得太过臃肿,如果 bean 需要进行关联的话,建议新建一个 properties 文件单独存储,这个时候就需要使用到一个注解 @PropertySource("classpath:")
书写一个JavaBean:
1
2
3
4
5
6
7
8
9
| @Component
@ConfigurationProperties("dog")
@PropertySource("classpath:dog.properties")
public class Dog {
private String name;
private List<String> eat;
}
|
书写dog.properties配置文件
1
2
| dog.name=忠犬
dog.eat=狗粮,通用宠物狼,肉
|
测试类
1
2
3
4
5
6
7
8
9
| @SpringBootTest
@RunWith(SpringRunner.class)
class SpringBoot02ConfigApplicationTests {
@Autowired Dog dog;
@Test
public void test1() {
System.out.println(dog);
}
}
|
配置文件绑定提示
在我们通过类绑定到配置文件之后,就可以在配置文件中照着类的格式书写内容,这里可以使用 springboot 为我们提供的一个工具来开启配置文件中的代码提示:
代码提示依赖
1
2
3
4
5
| <dependency>
<groupId>org.springframework.boot</groupId>
<artifactId>spring-boot-configuration-rocessor</artifactId>
<optional>true</optional>
</dependency>
|
依赖引入后在配置文件中就会有代码提示啦,但是这个依赖在负责我们在编码程序中使用,项目真正上线的时候就没有必要在留着他了,所以我们最好在项目打包前将这个依赖删除,或者让他不参与打包:
配置依赖不参与打包
1
2
3
4
5
6
7
8
9
10
11
12
13
14
| <build>
<plugins>
<plugin>
<groupId>org.springframework.boot</groupId>
<artifactId>spring-boot-maven-plugin</artifactId>
<configuration>
<exclude>
<groupId>org.springframework.boot</groupId>
<artifactId>spring-boot-configuration-rocessor</artifactId>
</exclude>
</configuration>
</plugin>
</plugins>
</build>
|
@Value注解获取值
当有些时候仅仅是想引用一下配置文件的值而不关联起来,这个时候需要用到@Value注解
当@ConfigurationProperties和@Value同时使用时,@ConfigurationProperties权限高于@Value
1
2
3
4
5
6
| @Component
public class Cat {
@Value("${person.cat.name}")
private String name;
}
|
测试是否拿到了值
1
2
3
4
5
6
7
8
9
| SpringBootTest
@RunWith(SpringRunner.class)
class SpringBoot02ConfigApplicationTests {
@Autowired Cat cat;
@Test
public void test1() {
System.out.println( cat.getColor() );
}
}
|
配置文件占位符
无论是在 properties 还是 yml 中都有着 占位符 的存在,占位符的表现形式是 ${ },使用占位符可以实现在引用配置文件内的值,生成随机数的功能
首先一个JavaBean
1
2
3
4
5
6
7
8
9
10
| @Component
@ConfigurationProperties("cat")
@PropertySource("classpath:cat.properties")
public class Cat {
private String name;
private int age;
private String number;
private String Remarks;
}
|
然后在cat.properties配置文件中使用占位符
1
2
3
4
5
6
7
8
|
cat.name=猫爷
cat.age=${random.int(1,10))}
cat.number=${random.uuid}
cat.remarks=${cat.name:匿名}_${cat.age:0}_${cat.sex:未知}
|
测试类代码:
1
2
3
4
5
6
7
8
9
| @SpringBootTest
@RunWith(SpringRunner.class)
class TestDemo {
@Autowired private Cat cat;
@Test
public void test1() {
System.out.println( cat );
}
}
|
配置文件存放位置
在SpringBoot中的配置文件只能放在指定的目录下才可以被识别,这里列举四个常用好记的存储位置,其中每个位置的配置文件之间分别有着优先级的概念
| ↑ 项目根目录 / config |
| ↑ 项目根目录 |
| ↓ resources / config |
| ↓ resources |
以上四个存放配置文件目录的顺序是按照由高到低的优先级进行排序的,优先级高的配置文件会覆盖优先级低的配置文件,但是只有在优先级高的配置文件中存在的配置信息才会被覆盖,而优先级高的配置文件中不存在的配置信息依然生效,这就诞生了互补配置,一个新的概念,可以利用这一特点对配置进行调优
Jar 命令行配置
修改某一项配置
我们可以在通过 java -jar 执行某个 jar 包的时候,手动修改某个配置项,例如:
java -jar xxx.jar --server.port=8888
java -jar xxx.jar --spring.profiles.active=prod
指定某个路径下的配置文件
除开之前四个比较常用好记的存放位置之外,还需要了解这个配置,在项目打包为jar包之后,可以在运行的时候手动指定需要使用哪一个 配置/本地磁盘 文件,例如:
1
| java -jar 项目名.jar --spring.config.location=文件路径
|
通过 命令行 指定的配置文件是目前 springboot 中已知 优先级最高 的,一般在项目打包成功后突然发现了 BUG ,这个时候就可以利用这种方法进行修改,而不用去项目中改后在重新打包
Profiles 模式
在本地开发程序时会连接本地的数据库,程序上线运行后会连接真正懂得生产库,我们可以随时修改配置文件来决定连接的库的地址,可如果需要修改的不止是数据库地址那就非常麻烦了
这个时候就可以使用 profile模式,创建多个配置文件,每个配置文件代表一个环境,然后我们可以通过少量的修改实现在多个环境之间来回的切换
profile模式要求文件命名的规范为:application-{profile}.properties/yml
profiles多配置文件
假设有三个环境的配置文件:【 默认环境,开发环境,生产环境 】,如果没有刻意配置则以默认环境为主:
当我们想要切换至开发环境或者生产环境的时候,只需要在默认配置文件上更改即可
1
2
3
|
spring.profiles.active=dev
|
yml文档块格式
除开 properties 和 yml 通用的这种多文件的形式,yml还单独存在一种多文档块模式,他使用三个减号将一个yml配置文件分割为若干份,每一份可代替一个环境
同之前的规则一样,三个文档快之间没有任何操作时,以默认环境为主
1
2
3
4
5
6
7
8
9
10
11
12
13
14
15
|
server:
port: 8008
---
spring:
profiles: dev
server:
port: 8081
---
spring:
profiles: prod
server:
port: 80
|
当我们想要切换至开发环境或者生产环境的时候,只需要在默认配置文件上更改即可
1
2
3
4
5
6
7
|
server:
port: 8008
spring:
profiles:
active: dev
|
打包后动态修改环境
我们将程序打为一个 jar 包之后,可以在运行该 jar 包的时候来指定通过什么环境运行,例如:
1
| java -jar application.jar --spring.profiles.active=dev
|
这种属于在运行 jar 包时动态添加参数进去,通过这种方式也可以设置端口号之类的:
1
| java -jar application.jar --server.port=8000
|
SpringBoot Web 开发
springboot 开发 WEB 应用程序需要在 pom.xml 中添加 WEB 的场景启动器:
1
2
3
4
| <dependency>
<groupId>org.springframework.boot</groupId>
<artifactId>spring-boot-starter-web</artifactId>
</dependency>
|
静态资源存放位置
在通常的 web 开发的项目中都有一个 webapp 的目录用来存放网页图片等静态资源,在 springboot 中可以发现在 resources 目录下有一个 static 文件夹,这个文件夹就类似 webapp 目录,可以存放静态资源
优先级问题
除开项目自带的 static 文件夹之外,springboot 还提供了其他的文件夹来存放资源,我们可以再 resources 目录下手动创建 [ public ] [ resources ],优先级为:resources > static > public,当访问同名资源时,优先级高的会覆盖优先级低的
首页设置
在以上的资源目录中任意一个目录下有 index.html 命名的文件,就会被设置为默认首页,当有多个目录中存在 index.html 文件,默认优先级高的会被设置为首页
自定义错误页
当请求不存在的资源或者服务器异常时会显示报错页,可以再静态资源目录下创建 error 文件夹,以 404.html 500.html 命名,springboot 会自动识别为自定义错误页
Thymeleaf 模板引擎
Thymeleaf 是 springboot 中的模板引擎,使用方法与 vue 有很多相似之处,可以获取域中的信息并在页面中显示,Thymeleaf 自带的视图解析器为 **resources目录下的 templates 文件夹,以 html 结尾
templates 目录下的 html 文件属于模板文件,不可以直接访问,必须通过视图解析器解析后才可以进行访问
初体验 Thymeleaf
1. 引用: 使用 Thymeleaf 模板语言需要引入maven依赖
1
2
3
4
5
6
7
8
9
10
11
12
13
14
|
<dependency>
<groupId>org.thymeleaf</groupId>
<artifactId>thymeleaf-spring5</artifactId>
</dependency>
<dependency>
<groupId>org.thymeleaf.extras</groupId>
<artifactId>thymeleaf-extras-java8time</artifactId>
</dependency>
|
2. 传值: 在控制器类中通过加入Model参数,然后在跳转页面之前addAttribute添加参数
1
2
3
4
5
6
| @RequestMapping("/test1")
public String test1(Model model){
model.addAttribute("msg","thymeleat传值");
return "1";
}
|
3. 取值: 在html页面中进行取值操作
使用 Thymeleaf 模板语言需要以 th: 为关键字开头,对参数进行操作
使用 th 关键字,需要在html标签之上添加 xmlns:th=“http://www.thymeleaf.org” 命名空间
读取值还可以使用 [ [ ] ] 来对值进行解析,类似Vue中的差值表达式
1
2
3
4
5
6
7
8
9
10
11
12
| <!DOCTYPE html>
<html xmlns:th="http://www.thymeleaf.org">
<head>
<meta charset="UTF-8">
<title></title>
</head>
<body>
<div th:text="${msg1}"></div>
<div th:utext="${msg2}"></div>
<h1 th:each="person : ${persons}"> [[${person}]] </h1>
</body>
</html>
|
Thymeleaf 视图解析器
使用 Thymeleaf 模板书写的 html 页面必须要放在 templates 目录下,而 templates 目录下的文件不可以被直接访问,需要通过视图解析器进行目录解析后才可以进行访问
自定义视图解析器
1
2
3
4
5
6
7
8
9
10
11
12
13
| public class MyViewConfig implements WebMvcConfigurer {
@Override
public void addViewControllers(ViewControllerRegistry regi) {
regi.addViewController("/index.html").setViewName("index");
regi.addViewController("/main.html").setViewName("dashboard");
}
}
|
转发与重定向的注意事项
- redirect 重定向的时候,有 / 为重定向到根目录的资源,无 / 为重定向到当前目录下的资源
- forward 转发,无论是否有 / 都是指向根目录的资源
Thymeleaf 帮助
指令
1
2
3
4
5
6
7
| th:text 以普通文本形式接收值
th:utext 接收值后可以解析为html
th:each 遍历接收到的容器,集合数组等 ( 变量 : ${容器名} )
th:fragment="name" 将当前标签及子标签内的所有元素封装为一个组件(不影响当前页),可以在其他页面引用name
th:insert="" 引用的方式通过name使用其他页面封装的组件,一般作用在div中,然后组件会填充到div内部
th:replace="" 替换的方式通过name使用其他页面封装的组件,一般作用在div中,然后组件会将当前dib标签替换
|
各种取值 – th 标识后才可以使用
1
2
3
4
| ${ } 表达式语句,可以书写表达式,例如if判断,三元运算,也可以获取传入的参数
@{/ } 表示超链接,在传参的时候不需要使用问好,需使用括号(key='value')
~{ :: } 用来实现组件化信息,::的左侧用来填写组件所在页面,右侧填写组件的名称
|
Thymleaf 的工具类 – #号开头
1
| ${#datas.format(date,str)} 时间格式化,按照指定格式输出data
|
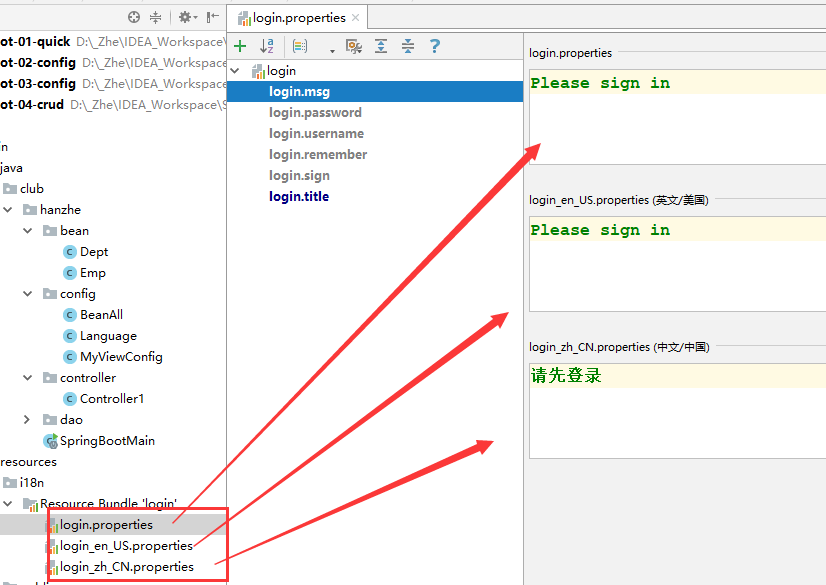
Thymeleaf 的国际化
在其他大型网站上几乎都可以看到,页面上有个标识可以设置当前页面显示的语言,这里就是用到了国际化 (i18n) 的技术,国际化是在资源目录中创建 N 多个 properties 配置文件文件,将各国语言分别按照指定的格式进行存放,然后将配置文件中的字符提取到页面上来,便实现了国际化效果
在语言修改完成后在 application.properties 中设置国际化配置文件所在目录
1
2
|
spring.messages.basename=i18n.login
|
自定义一个地址映射类,实现 LocaleResolver 接口,用来分析请求并设置当前页面显示的语言
1
2
3
4
5
6
7
8
9
10
11
12
13
14
15
| public class Language implements LocaleResolver {
@Override
public Locale resolveLocale(HttpServletRequest req) {
String language = req.getParameter("language");
Locale locale = new Locale("en","US");
System.out.println("[Debug] language=" + language);
if( language != null )
locale = new Locale(language.split("_")[0],language.split("_")[1]);
return locale;
}
@Override
public void setLocale(HttpServletRequest request, HttpServletResponse response, Locale locale) {
}
}
|
之后可以需要将地址映射类装配到 Ioc 容器中,需要注意的是 地址映射类的 name 必须是 localeResolver
1
2
3
4
5
6
7
| @Configuration
public class MyViewConfig implements WebMvcConfigurer {
@Bean("localeResolver")
public Language language(){
return new Language();
}
}
|
最后只需要在页面中使用 Thymeleaf 模板来获取配置文件中的值并输出在页面上即可
1
2
3
4
5
6
7
8
9
10
11
| <!DOCTYPE html>
<html xmlns:th="http://www.thymeleaf.org">
<head> </head>
<body>
<h1 th:text="#{login.msg}"></h1>
[[ #{ login.msg } ]]
</body>
</html>
|
SpringBoot 的拦截器
在 SpringBoot 中使用 MVC 的拦截器,同样需要实现 HandlerInterceptor 接口,同样也要复写其中的方法,通过逻辑代码判断该请求是否可以访问
1
2
3
4
5
6
7
8
9
10
11
12
13
| public class MyInterceptor implements HandlerInterceptor {
@Override
public boolean preHandle(HttpServletRequest req, HttpServletResponse resp, Object handler) throws Exception {
System.out.println("拦截器开始工作");
if ( req.getSession().getAttribute("user") == null ){
System.out.println("拦截了一次请求");
req.setAttribute("msg","请登录后在进行操作");
req.getRequestDispatcher("/index.html").forward(req, resp);
return false;
}
return true;
}
}
|
之后的注册拦截器,需要通过配置类复写 addInterceptors 方法进行注册,是否被拦截器排除,拦截器都会进行拦截,只不过满足条件的在被拦截器拦截后还是会正常工作
1
2
3
4
5
6
7
8
9
10
11
12
13
14
| @Configuration
public class MyViewConfig implements WebMvcConfigurer {
@Override
public void addInterceptors(InterceptorRegistry registry) {
InterceptorRegistration interceptor =
registry.addInterceptor(new MyInterceptor());
interceptor = interceptor.addPathPatterns("/**");
interceptor.excludePathPatterns("/", "/index", "/index.html", "/user/login",
"/asserts/**", "/1.html", "/2.html");
}
}
|
SpringBoot 中使用 AOP
在 SpringBoot 中使用 aop 面向切面编程需要引入对应的 starter 启动器
1
2
3
4
| <dependency>
<groupId>org.springframework.boot</groupId>
<artifactId>spring-boot-starter-aop</artifactId>
</dependency>
|
-
这里默认使用的是 Java 的 JDK 动态代理模式,如果想使用 CGLIB 需要在配置文件中添加以下配置:
-
spring.aop.proxy-target-class=true
1
2
3
4
5
6
7
8
9
10
11
12
13
14
15
16
17
18
19
20
21
22
23
24
25
|
现在就可以书写切面类了,因为 springboot 优于配置简化,所以这里使用注解的方式进行 aop 切入
> 使用 `@Aspect` 注解来标识当前类是切面类,然后在使用 `@Component` 将切面类交给 Spring 进行管理即可
```java
@Aspect
@Component
public class Aop1 {
@Before("execution(public * site.hanzhe.service..*(..))")
public void before(JoinPoint join){
System.out.println("[Debug] "+join.getSignature().getName()+" 方法执行");
System.out.println("[Debug] 执行时间:" +
new SimpleDateFormat().format(new Date()));
}
}
```
至此 aop 就可以正常使用了,如果发现 aop 不生效可以尝试在配置文件中添加如下配置:
> 因为该选项是默认开启的,所以一般不需要去更改他,但是当aop无效的时候可以尝试手动开启他
~~~properties
# 开启SpringBoot的aop功能
spring.aop.auto=true
|
SpringBoot 的过滤器
在 SpringBoot 中创建过滤器类,那么该类首先要实现 Filter 接口,然后配合注解进行使用
实现 Filter 接口,使用 @WebFilter("/*") 生命他是过滤器,然后配合 @Order(1) 来指定优先级
1
2
3
4
5
6
7
8
9
10
11
12
13
14
15
16
17
18
19
20
21
|
@Order(1)
@WebFilter("/*")
public class CorsFilter implements Filter {
@Override
public void init(FilterConfig filterConfig) throws ServletException {}
@Override
public void doFilter(ServletRequest servletRequest,
ServletResponse servletResponse,
FilterChain filterChain) throws IOException, ServletException {
filterChain.doFilter(servletRequest, servletResponse);
}
@Override
public void destroy() {}
}
|
在配置好过滤器之后还要在启动类中使用 @ServletComponentScan 进行扫描,被扫描到的类才可以生效
1
2
3
4
5
6
7
| @SpringBootApplication
@ServletComponentScan("site.hanzhe.filter")
public class Springboot03Application {
public static void main(String[] args) {
SpringApplication.run(Springboot03Application.class, args);
}
}
|
经典:处理跨域请求过滤器
1
2
3
4
5
6
7
8
9
10
11
12
13
14
15
16
17
18
| @WebFilter("/*")
public class CorsFilter implements Filter{
@Override
public void doFilter(
ServletRequest request,
ServletResponse response, FilterChain chain)
throws IOException, ServletException {
HttpServletRequest req = (HttpServletRequest) request;
HttpServletResponse resp = (HttpServletResponse) response;
resp.setHeader("Access-Control-Allow-Origin", req.getHeader("origin"));
resp.setHeader("Access-Control-Allow-Credentials", "true");
chain.doFilter(req, resp);
}
}
|
SpringBoot 持久化
整合 JDBC
在 SpringBoot 中整合 JDBC 非常简单,省去了繁琐的 xml 配置文件
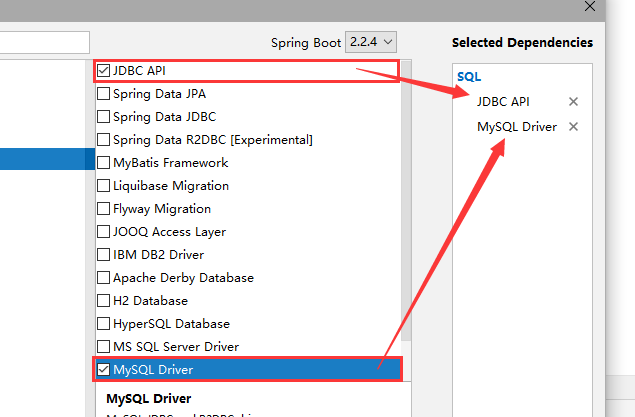
简单配置 JDBC
1. 在创建 SpringBoot 时勾选 JDBC 和指定数据库驱动
2. 在配置文件中配置数据源相关信息
1
2
3
4
5
6
7
| spring.datasource.driver-class-name=com.mysql.cj.jdbc.Driver
spring.datasource.url=jdbc:mysql://localhost:3306/mydb?serverTimezone=UTC
spring.datasource.username=root
spring.datasource.password=zhang
spring.datasource.type=
|
3. 这样一来 JDBC 就已经配置完成,只需要进行测试即可
1
2
3
4
5
6
7
8
9
10
11
12
13
14
15
16
17
| @SpringBootTest
class ApplicationMainTests {
@Autowired private DataSource ds;
@Test
public void test1() throws Exception{
System.out.println("数据源:" + ds);
Connection conn = ds.getConnection();
System.out.println("连接器:" + conn);
PreparedStatement pre = conn.prepareStatement("SELECT * FROM t_user");
ResultSet result = pre.executeQuery();
while (result.next()){
System.out.print("ID = " + result.getInt(1));
System.out.print(", 姓名=" + result.getString(2));
}
}
}
|
JdbcTemplate 模板
SpringBoot 提供了预置好的jdbc模板,叫做 JdbcLate ,可以通过这个模板快速的对数据库进行操作
1
2
3
4
5
6
7
8
9
10
11
12
13
14
15
16
17
| @SpringBootTest
class ApplicationMainTests {
@Autowired private JdbcTemplate jt;
@Test
public void test2() throws Exception{
List<Map<String, Object>> list_map = jt.queryForList("select * from t_user");
for (Map map : list_map)
System.out.println(map);
}
@Test
public void test3() throws Exception{
String sql = "insert into t_user values (null, ?, ?, ?, ?, 'guest')";
String []arr = {"楚易","46514","sadlj","30000"};
int i = jt.update(sql, arr);
System.out.println(i==1 ? "执行成功!" + i + "行收到影响" : "执行失败!");
}
}
|
整合 MyBatis
使用 SpringBoot 整合MyBatis 需要创建项目时勾选 mybatis 或者直接添加 maven 依赖
1
2
3
4
5
| <dependency>
<groupId>org.mybatis.spring.boot</groupId>
<artifactId>mybatis-spring-boot-starter</artifactId>
<version>2.1.1</version>
</dependency>
|
1. 在配置文件中定义数据库的配置信息,然后配置 mybatis 的整合
1
2
3
4
5
6
7
8
9
10
11
12
13
14
|
spring:
datasource:
driver-class-name: com.mysql.jdbc.Driver
url: jdbc:mysql:///mydb
username: root
password: zhang
mybatis:
type-aliases-package: site.hanzhe.bean
mapper-locations: classpath:mapper/*Mapper.xml
configuration:
log-impl: org.apache.ibatis.logging.stdout.StdOutImpl
map-underscore-to-camel-case: true
|
2. 对应数据表创建响应的 pojo
这里使用 Lombok 生成的 get set toString 等方法
1
2
3
4
5
6
7
8
9
10
11
| @Data
@NoArgsConstructor
@AllArgsConstructor
public class User {
private Integer id;
private String userName;
private String userId;
private String password;
private Integer rmb;
private String type;
}
|
3. 书写接口
接口需要使用 Mapper 注解来标识接口开发,同时要使用 Repository 注解将该接口交给 Spring 管理
1
2
3
4
5
| @Mapper
@Repository
public interface UserDao {
public List<User> findAllUser();
}
|
如果在不适用 Mapper 注解的情况下,可以在启动类中使用 MapperScan 来批量扫描所有 mapper 接口
1
2
3
4
5
6
7
| @SpringBootApplication
@MapperScan("site.hanzhe.dao")
public class ApplicationMain {
public static void main(String[] args) {
SpringApplication.run(ApplicationMain.class, args);
}
}
|
4. 对应接口写 mapper 映射文件
1
2
3
4
5
6
7
8
9
| <?xml version="1.0" encoding="UTF-8" ?>
<!DOCTYPE mapper
PUBLIC "-//mybatis.org//DTD Mapper 3.0//EN"
"http://mybatis.org/dtd/mybatis-3-mapper.dtd">
<mapper namespace="site.hanzhe.dao.UserDao">
<select id="findAllUser" resultType="user">
select * from t_user
</select>
</mapper>
|
5. 测试类
SpringBoot 自动完成了所有操作,只需要直接调用 dao 就可以完成
1
2
3
4
5
6
7
8
9
10
| @SpringBootTest
class ApplicationMainTests {
@Autowired private UserDao dao;
@Test
public void test1() throws SQLException {
List<User> list = dao.findAllUser();
for (User u : list)
System.out.println(u);
}
}
|
PageHelper 插件
在 springboot 中整合 mybatis 时同样也可以使用 PageHelper 进行分页,导入 springboot 的分页插件依赖:
1
2
3
4
5
| <dependency>
<groupId>com.github.pagehelper</groupId>
<artifactId>pagehelper-spring-boot-starter</artifactId>
<version>1.2.12</version>
</dependency>
|
由于 springboot 不需要书写 mybatis 的配置文件,所以有关分页的配置都在 properties 或 yml 中进行配置:
1
2
3
4
5
6
7
8
9
10
|
pagehelper.helperDialect=mysql
pagehelper.reasonable=true
pagehelper.params=count=countSql
pagehelper.supportMethodsArguments=true
pagehelper.page-size-zero=true
|
这样 springboot 的 PageHelper 就配置完成了!关于 PageHelper 更多使用方法在 mybatis 中查看